Showing posts with label nest. Show all posts

Friday, May 1, 2009

Fog Linen Dresses and Wedding Hairpieces

Have you been privileged to browse the pages of Selvedge mag? I think I ran across it online somewhere and still do not have a prescription, subscription I mean. The dry goods section of the website is my favorite and I always want to buy something, especially from Fog Linen. They make exactly the sort of clothes and linens that I have envisioned for my home. Simple, rustic and natural.

I visited them online again today and it seems that they have updated their website. It's hard for me to tell since I don't read Japanese. Very frustrating. All I want are a couple of simple linen dresses to wear to wedding parties this summer in DC. I don't get crazy about fashion so when I come across something to wear or put in my home that looks like it's been there for a century and could go another, then I get excited. The Fog Linen line meets criteria.

Fog Linen's house linens may be purchased through a few US retailers if you're interested. Maybe a unique gift for newlyweds?

Speaking of weddings... thought I'd share a couple of hair pieces I made last spring. They're made of hand felted merino wool, silk yarn, pearl beads and little flowery wedding doodads. I like the way that the leaves on the larger piece sticks out in crazy directions.

By the way, Happy May Day.

Thursday, April 2, 2009

Knitted Pillows and Spring Markets

I've been knitting more pillows and thought I would share some pictures.


The basic design is very plain, which I like. One of them does have a single cable going up one side to add a bit more interest. Cotton taping was used to make tie closures for a couple of them and buttons on one. The ties look very casual and the buttons a bit cleaner.


They are all filled with feather and down inserts and are some of the most comfortable pillows I've ever had. I want them to be imminently usable which is why they all close on the end so there is no front or back. Un-dyed eco-wool was used to knit these up. It has a very soft hand after blocking.

I'm still hoping to find some unique handspun yarn to make a couple from but haven't had to much time to pursue that option. Maybe soon! It's almost time for local festivals and farmer's markets and I may be able to find something there. Though I'm not sure about this option since the Midwest seems to be a little slower to catch on to this idea, but they are becoming more common and lively. Wouldn't it be great to have a year round market like some of the ones in Europe?
I'll be making a trip to DC this summer. Know of any good markets for handmade goods or antiques?
I found this website that lists a number of markets but is otherwise uninformative.
This one gave a bit more info on one market.
I'll have to check this one out...
where these sellers will be.
This one looks like fun.
I'd love to know if are any interesting places to go during the week too. We're going to DC for a wedding so the weekend of our trip is already full and any side trips will have to be squeezed in.
I love spring.

Friday, March 27, 2009

What is Natural Modern Country?

So what is the Natural Modern Country look anyway? It's my idea of a comfortable interior space, a mixture of Natural and Modern Country. Other styles may make their way into my decorating, out of the necessity to stay within a very tight budget. It may be interesting however to see what can be done on a (broken) shoestring budget -a sort of experiment.

I decided on this look because the images that most attracted me fell into these two categories. It is very difficult though! I also find myself being drawn to a comfortable Traditional Country (without the hearts). And while the Retro and Mid-Century Modern looks are not my personal favorites it is very possible that a bit of Danish Modern could find it's way in.

Natural is defined in The Home Style Sourcebook as having "warm tones and heavily textured surfaces". It is also eco-conscious in that it uses natural, sustainable, recycled and re-purposed (I love that word) materials.

Modern Country is described in The Home Style Sourcebook as using a "minimalist white palette in which various shades of white are exploited against each other...unusual sculptural objects, once practical...thoughtful mixture of modern and antique objects and furniture, with the emphasis on comfort."

I see Natural Modern Country as being a warmer, eco-conscious version of Modern Country.

Below are a few pics of the Modern Country and then the Natural styles from three of my favorite books, The Natural Home by Judith Wilson, The Home Style Sourcebook by Geddes-Brown, Sorrell & Wilson. and Simple Style by Julie Bird

Modern Country:
The architecture of the room is very country but the bed is dressed in a more modern way and there is a gridded rug on the floor.


This seems to be a cob house, probably in the Southwest of England in County Devon. No telling how long it's been there. A home such as this will stand for hundreds of years. That's the way to build!


This is an idea that I plan to use in my living room. I'll be exchanging my oriental style rug for a jute or sisal one and my heavy, gi-normous mission style coffee table for one that is visually lighter. My ceilings are 12' high plus a skylight and the coffee table really seems to weigh the room down and throw it out of balance.

There was a young lady who wed a philosopher
and all of his books were such a challenge to her!
Spread out here and stacked over there,
these books need a place if this house we will share!

All of my husband's (and daughter's) books are a constant challenge for me. He even has lesser used books stacked to hold shelves to hold more books!

If I could realize something like the picture to the left in my own home a major battle will have been won.

This pic is from Simple Style by Julia Bird.


Natural:

You can really get a sense of warmth from this picture. It's not stuffy though and there are plenty of clean lines .


We have a couple of amazing leather club chairs that my husband purchased from craigslist. I look forward to achieving a more neutral scheme so they will standout.


This bedroom is very white but doesn't feel cold because of the warm color of the tiles, the extra fabric around the bed, the quilt over the table and the natural wood ceiling. It's actually classified as Natural Country in The Natural Home. I can't go this country since mine is an urban abode.
The gingham pillows let you know that this is a rural home.
I think its gorgeous!

These are just a few of the many, many images I am working with. There are a number of great books to help me along. Most of them are checked out from my public library. I use my digital camera to take pictures of my favorites and then build a gallery that I can refer back to.

Friday, March 20, 2009

"New" home, "new" blog

I have a new look. What do you think? The other felt a little busy. The blog didn't feel consistent with my home life so a change was needed!
Just thought I'd include a few pictures from home. They could actually be considered 'before' pics or at least 'in progress' pics. As rooms are finished I'll post before and after pics with comments on how it was done. I will be going for a natural modern country look on a budget. Though I hope the 'on a budget' part won't be noticeable.

We live in an apartment in the city. It's a large space (for which we are very thankful) but it can feel a bit tight at times. All the more reason that it should be restful and well ordered.
For some time after my husband finished his PhD I chose not to pay too much attention to "making a home" because I thought we would buy a house within the near future. The near future is now past and we have not bought a house. But we have come to realize that no matter what sort of structure we may live in, it is our home. So, why should I frustrate myself by suppressing those nesting instincts?
Having also been influenced by A Pattern Language, which speaks strongly against rental situations, I rebelled against our own. Good did come of my reading however. We decided not to treat our apartment like someone else's place but like our home, which it is! My husband and I still plan to buy a house (actually a small farm in the UK with a cob house, cow and sheep...) but in the meantime we'll enjoy making our home together wherever we are. We even have a back deck and a parking space here! For what are we lacking?

Our bathroom cabinet used to have a large retro mirror for a door and it just didn't go so we removed it. Our bedroom closet was dark and the top clothes rail (which used to run across the back) was so high we could hardly reach it! After gutting the closet, we refinished it almost completely with stuff that we already had. I'm planning on hanging a few framed pictures on that back wall. Not what you'd expect, but why not?
My "nesting instinct" grew stronger last spring as I watched a bird building a nest in the rafters of our deck. She flew away and then returned with some find for her new place while decorating my iron chandelier at the same time. It's a year later and officially a new spring. I hope to see her again and be encouraged by her efforts.


Wednesday, March 11, 2009

Bath Mitt Pattern & Pillow

Here are a couple of quick projects that I have been working on over the last couple of weeks.

The first is a pillow knit from humble fisherman's wool. Very simple but, I think, very classic. The idea came from a picture I saw in an European interior design book. Those pillows were of sewn fabric. My version is knit in the round and closes with a simple cotton tie at one end. Because of this, there's no front or back. I plan on making more in different sizes for our sofa, chairs and bedrooms, and I am presently on the lookout for some unique, natural fiber yarn in neutral colors. Preferably worsted or heavy worsted with a decently tight spin. I'm open to suggestions.


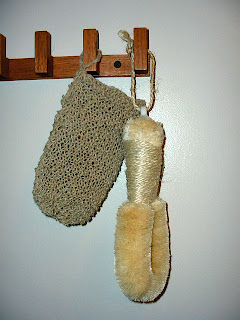
The second project is a very useful bath mitt made of hemp. One of my favorite books is Essential Home by Judith Wilson. In the bath section she shows beautiful pictures of bathrooms with clean white towels, linen hand towels and natural body scrubbers. I found and purchased a version of the body brush and nail brush from an online retailer, the All Natural Products Store. The website is not very inviting and is difficult to navigate but the prices are right. Here's the link: http://www.pacwestserv.com/bathessent01.htm .

(FYI -they also have Lewis Labs' brewer's yeast for a great price in case you were looking for some.)


I decided to make my own bath mitt and picked up a ball of 20 lb Beadsmith Hemp Cord for about $4.50 at the local hobby shop in the bead section. It is stiff to knit with, but there's something about the rough texture that is attractive. I was envisioning an invigorating scrub in the shower as I knitted. That probably helped.


I made a gauge swatch and wrote a simple pattern which you'll find below. If you decide to make one, let me know how it goes or if you find any problems (which there may be some, as this entry was written very late at night).


Hemp Bath Mitt
S/M (M/L)

This takes 4hrs or less to make.

Supplies:


-1 ball 20lb. Hemp Cord
-Size 9 Needles, straight or circular
-Size 9 Needles, double pointed

Body:

CO 32 (36).
K 14 (16) rows in garter stitch.
Place marker 15 (17) sts from each end (on either side of 2 middle sts).
K to marker, K1, M1 twice, K to end. 34 (38) sts
K across row.
K to marker, K1, M1 4 times, K to end. 38 (42) sts
Knit across row.
K to marker, K2, M1 8 times. 42 (46)sts
K across row.
K to marker, hold 8sts (remove markers), K to end. 32 (36) sts.
K 29 (31) rows in garter stitch.
K2, K2tog across row. 24 (27) sts.
K across row.
K across row.
K2tog across row. 8 (9) sts.
Cut yarn leaving enough length to sew up the side of the mitt (about 2.5 times the length of the mitt).
Draw through remaining stitches, pull tight and secure.
Turn mitt inside out and sew side of mitt closed.

Thumb:
Place 12 held thumb stitches on 3 size 9 double pointed needles.
Knit 14 (16) rows garter stitch in the round beginning with a purl row.
K2tog 1 round.
Cut yarn and draw through remaining stitches and secure.

Crochet or braid a small loop at one side of bottom edge to hang your mitt by. If the ends are long enough, use them to make a loop. Secure well.

Weave in all ends.

The mitt will need to be rinsed well in hot water a few times before use. There's something (I don't know what) in the yarn that needs to come out or your mitt will not look very clean after you use it. It also shrinks so if you're unsure about your size, make the larger one.

This pattern fits well but I'm not sure I like how the thumb looks. So you should see an alternative pattern soon with a different thumb.

Thanks for stopping by! Oh yeah, Happy St. Patrick's Day too. (I'll be helping my friend out at her Irish shop this weekend so I thought that was appropriate and I mean it sincerely.)

Wednesday, February 11, 2009

Small Felted Box with Lid

I'm into containers lately. Places to store things. Baskets and boxes made from natural materials are the preferred choice (no plastic please). It is best if the container has a lid so you don't have to see what's in there all the time.

I was looking for a quick project and thought to knit and felt a small container for myself. (I needed a break from my husband's black sweater.)

A quick look at some of my favorite knitting sites did not yield any patterns for a lidded container so I decided to write one. Here it is for you to try. Let me know what you think.


Small Felted Box with Lid

Note about yarn: I used Lamb's Pride because I had some in my stash but a less hairy yarn would be preferable for this project.

Materials:
Bulky wool yarn (about 40yds)
Small amount of heavy worsted or bulky wool yarn in contrasting or toning color for trim
Three buttons about 5/8” in diameter and thread to match main color

Sewing needle

Needles:
Size 11 or 13 double pointed needles
Size M or N crochet hook
(Note: Gauge is not especially important since the piece will be felted in the washer.)

Finished measurements after felting:
Approximately 5”long x 5”wide x 2”deep

Box:
Using double pointed needles CO 14.
Knit 18 rows in Stst.
Leaving stitches on the needle pick up 14 from other three sides.
Knit 10 rounds.
BO all stitches. Weave in ends.

Lid:
Using double pointed needles CO 15.
Knit 19 rows.
BO all stitches. Weave in ends.

Trim:

Using crochet hook and contrasting/toning yarn single crochet around the top edge of box and edge of the lid (about 3 chain stitches for every 4 knitted stitches). Next crochet a loop of 10 chain stitches in the center front of the lid and two loops of the same size on the back of the lid about 3sts from each corner. (You could also crochet loops at the same time as the trim. Just be sure the loop begins and ends in the same stitch.) Weave in ends.

Felting (or fulling):

Put the box and lid in the washer (preferably front-loading) and run for the full wash cycle. Check the size and pull into shape. You may need to run it through another cycle or part of a cycle checking the size periodically. When the box reaches the desired size, put it back in the washer for one rinse and then spin.

Pull the box and lid into shape and lay flat to dry.

Sew on the buttons and your box is finished.

Tuesday, January 20, 2009

Studio-in-a-Closet

This is just a little something I wanted to share for inspiration. We live in an apartment in an urban area so storage space is limited. My husband came up with the idea to convert our foyer closet into stash storage. (I had already taken the dining room as my studio and it was overflowing.)

I really wish I had taken before pictures. Imagine if you will a dark hole (really) with a couple of press board shelves instead of the bright welcoming closet you now see.

We stripped everything out of the space, added shelving, pegs, a cedar ceiling, a light and even a secret compartment in the floor for storing larger items. I hung an over the door shoe bag to provide extra yarn storage. Because we included the pegs the closet can still be used as a coat closet when we have guests!

This was a fun project for my husband and I to tackle together. I guess I should finish that sweater for him now.

Monday, January 12, 2009

Linen Pillowcase

This project for a small linen pillowcase arose from a need. I have struggled with serious headaches for years and they have only gotten worse. I've tried all sorts of migraine pills, changes in my diet and finally, a buckwheat pillow. Buckwheat pillows have been used for centuries in the Far East. I purchased a Serenity buckwheat pillow from Healthy Green Goods. It is definitely one of the best purchases I have ever made. If given the slightest opportunity I gladly share my experience with others suffering from headaches, back and neck pain or even restless sleep. I have not had a migraine for months now which means that I have more time to knit!

Now I have this wonderful pillow but it needed a special case. Yes they had some on offer at Healthy Green Goods but I wanted to make my own. Besides my yarn stash I have a nice little stash of fabrics. From this I chose a cream colored linen.

Here's how I made the case:

The pillow is very small, only 11"x17", so I measured and cut the fabric to 16"x26". A little long because I wanted to embroider and then fold in the edge to cover the back of the stitching.

Sew the sides of the case using a 1/4" seam. Sew another seam about 1/8" outside of the first seam. Trim. Make a small double folded hem along the open edge.

Next measure 4" and 8" from the hemmed edge and between those two marks make three evenly spaced marks. (All of these markings are made by placing small dots all the way around the case.)

Following the evenly spaced marks embroider three rows of simple running stitch using mercerized cotton.

Turn the case wrong side out and fold at the 4" line enclosing the embroidery. Stitch down by following the previously made hem stitch. Lastly stitch 1/8" from the edge of the pillowcase, along the fold.

Press and enjoy your new buckwheat pillowcase!


I think the next one I make will have a knitted lace edge. I'll continue to contemplate that idea.