 Here are a couple of quick projects that I have been working on over the last couple of weeks.
The first is a pillow knit from humble fisherman's wool. Very simple but, I think, very classic. The idea came from a picture I saw in an European interior design book. Those pillows were of sewn fabric. My version is knit in the round and closes with a simple cotton tie at one end. Because of this, there's no front or back. I plan on making more in different sizes for our sofa, chairs and bedrooms, and I am presently on the lookout for some unique, natural fiber yarn in neutral colors. Preferably worsted or heavy worsted with a decently tight spin. I'm open to suggestions.
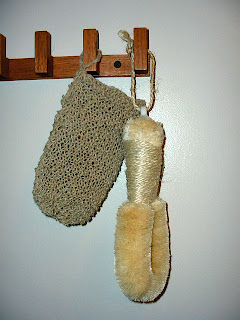 The second project is a very useful bath mitt made of hemp. One of my favorite books is Essential Home by Judith Wilson. In the bath section she shows beautiful pictures of bathrooms with clean white towels, linen hand towels and natural body scrubbers. I found and purchased a version of the body brush and nail brush from an online retailer, the All Natural Products Store. The website is not very inviting and is difficult to navigate but the prices are right. Here's the link: http://www.pacwestserv.com/bathessent01.htm .
 (FYI -they also have Lewis Labs' brewer's yeast for a great price in case you were looking for some.)
I decided to make my own bath mitt and picked up a ball of 20 lb Beadsmith Hemp Cord for about $4.50 at the local hobby shop in the bead section. It is stiff to knit with, but there's something about the rough texture that is attractive. I was envisioning an invigorating scrub in the shower as I knitted. That probably helped.

I made a gauge swatch and wrote a simple pattern which you'll find below. If you decide to make one, let me know how it goes or if you find any problems (which there may be some, as this entry was written very late at night).
Hemp Bath Mitt
S/M (M/L)
This takes 4hrs or less to make.
S/M (M/L)
This takes 4hrs or less to make.
Supplies:
-1 ball 20lb. Hemp Cord
-Size 9 Needles, straight or circular
-Size 9 Needles, double pointed
Body:
CO 32 (36).
K 14 (16) rows in garter stitch.
Place marker 15 (17) sts from each end (on either side of 2 middle sts).
K to marker, K1, M1 twice, K to end. 34 (38) sts
K across row.
K to marker, K1, M1 4 times, K to end. 38 (42) sts
Knit across row.
K to marker, K2, M1 8 times. 42 (46)sts
K across row.
K to marker, hold 8sts (remove markers), K to end. 32 (36) sts.
K 29 (31) rows in garter stitch.
K2, K2tog across row. 24 (27) sts.
K across row.
K across row.
K2tog across row. 8 (9) sts.
Cut yarn leaving enough length to sew up the side of the mitt (about 2.5 times the length of the mitt).
Draw through remaining stitches, pull tight and secure.
Turn mitt inside out and sew side of mitt closed.
Thumb:
Place 12 held thumb stitches on 3 size 9 double pointed needles.
Knit 14 (16) rows garter stitch in the round beginning with a purl row.
K2tog 1 round.
Cut yarn and draw through remaining stitches and secure.
Crochet or braid a small loop at one side of bottom edge to hang your mitt by. If the ends are long enough, use them to make a loop. Secure well.
Weave in all ends.
The mitt will need to be rinsed well in hot water a few times before use. There's something (I don't know what) in the yarn that needs to come out or your mitt will not look very clean after you use it. It also shrinks so if you're unsure about your size, make the larger one.
This pattern fits well but I'm not sure I like how the thumb looks. So you should see an alternative pattern soon with a different thumb.
Thanks for stopping by! Oh yeah, Happy St. Patrick's Day too. (I'll be helping my friend out at her Irish shop this weekend so I thought that was appropriate and I mean it sincerely.)


